Showing posts with label Sigma. Show all posts

Tuesday, 7 May 2013

Da Glove (but not from Sigma!)

I 'm sure you 've all seen the Brush Cleaning Glove by Sigma. It is a little wonder, an innovation itself, in many eye catching colors, that makes brush washing a breeze.

I wanted it. Desperately. Passionately. I was set on buying it. I mean, I don't have as many brushes as a makeup artist (by any means) but, I 'm quite adamant about washing my brushes once a week and it is undeniably a chore. Depending on the brush, I may have to wash some of them repeatedly 3-4 times to remove all product (Sigmax I 'm looking at you!) and taking into consideration that I spot clean them every time I use them, it says a lot about how much gunk a brush can collect.

What the Sigma Brush Cleaning Glove is supposed to do (and I don't doubt a bit that it does deliver) is that it makes washing, rinsing and shaping your brushes a joy, something that sounds at first like a retro add where the happy and oh so pretty and polished housewife manages a whole household without loosing a curl from her hairdo (seriously???).

So, I watched a few videos and I saw that it actually does what it promises, with flying colors.

But there was a huge boulder between us...

The glove of gloves, the promised land of all dirty brushes waiting anxiously to be fresh and clean, costs $39!!! Plus twenty something bucks for shipping to Greece, we 're talking over $60 in total!!!

No, it doesn't make coffe as well. No it doesn't give you directions when you 're in the car, lost in another space and time dimension (like, next block from your house, lol!). No it doesn't wake you up in the morning. It just sits there, waiting for you to cover it in soap and water and clean your brushes on it.

But it has groves or should I say "variety of textures and surfaces" and did I mention it comes in all sorts of fun colors? Yeah.

Now, here's a hot topic: how much do your brushes cost? Depending on the total cost - money invested - on your brushes, maybe $40 + shipping isn't that absurd.

To me, it's not that I don't value my brushes but this price point seems completely exuberant, for something that costs 2-3 dollars to manufacture. It's plain (and ineffective) marketing tactic that says that consumers are sheep and will buy everything as long as it is in a pretty package. Well, sometimes at least we 're not sheep, surprise!

The results were that even famous beauty gurus, that got it for free, raved about how practical it is but also admitted that they probably would never buy it, because of the unreasonable price.

So, after deciding that I didn't want to throw $60+ on a rubber glove, I decided to improvise a bit and did an eBay research on rubber glove, rubber mitt, etc.

And guess what? I found a decent priced one, at $8 with free shipping.

Don't get me wrong, it 's not the same product but it does more or less the same thing.

Here it is!

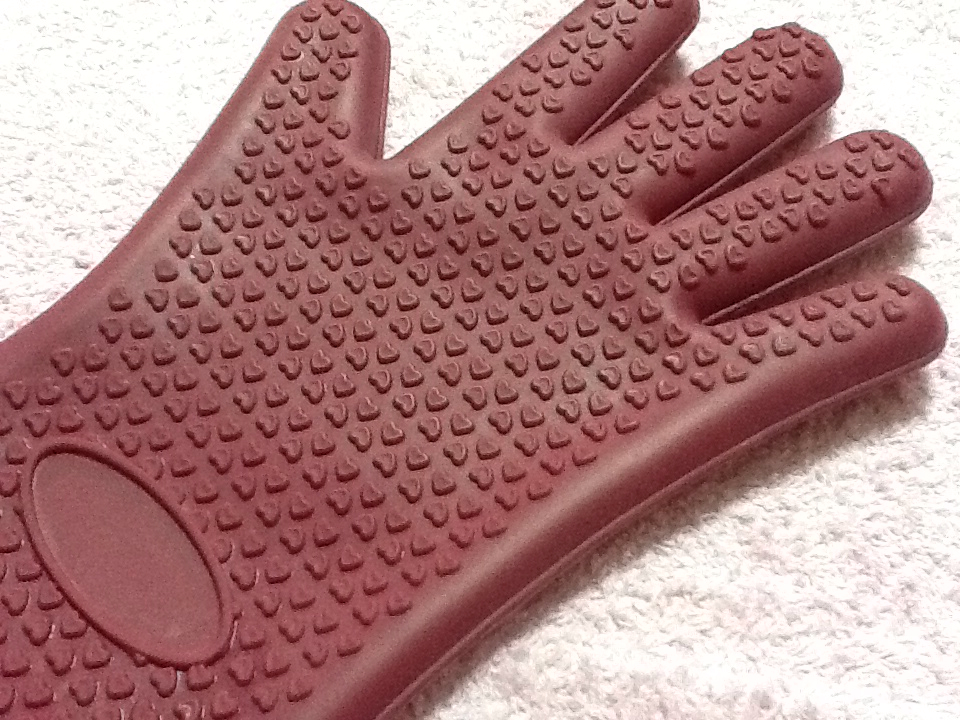
Isn't it prettttyyyyyy? It even has little hearts, awwwwwww (no, I 'm not brain damaged....)

What I looked for was substantial groves, because most of them have really shallow ones. This was one of the cheapest that has some decent texture, so I decided to get it.

Bottom line: Is it effective?

Well, yes! I can't say how it works in comparison to the real thing but it does clean my brushes thoroughly at a fraction of the time I had to spend when I cleaned them by hand.

I 've used it in order to wash my Mac brushes, Real Techniques brushes, even the oh so hard to clean Sigma Sigmax brushes. Most of them need only one wash, whereas the Sigma ones need two washes.

So, all in all I'm very pleased with it because it's definitely effective and a great value for money, I do have a reservation though: I don' t know how (and if) it will affect the brushes in the long run, because my hand is obviously a softer surface than the glove. I try to be gentle and not rub them viciously on the glove, but, some times, when I 'm in a hurry, I do tend to be a little slack and rub them a little too vigorously.

I 'm not so concerned about the synthetic bristles because I do think they 're more durable but the "regular" brushes (made from animal hair) need extra care. So far though (I 've been using it for over a month now) I haven't notice any hair loss, so, maybe that 's a good sign!

Now, that 's a lot of ink over an oven glove but it does deserve it and I wanted to share with you an alternative to - the much debated of - Sigma glove. It 's not the same thing but it does the job, at a fraction of the price.

That 's it for now, I hope you 're all well and thriving!

Χρόνια Πολλά, εύχομαι να γυρίσετε ασφαλείς όλοι σπίτια σας με τις μπαταρίες γεμάτες!


Sunday, 2 September 2012

Basic tools: Affordable and effective

In order to achieve the best looks, tools are mandatory. Fortunately there's an abundance of brushes out there, in various prices, so that everyone can buy the tools of choice at the desired price.

But do we need every brush that's available on the market? The answer in no, and I will explain why.

Buying a more affordable brush, does it mean that we have to compromise on quality and effectiveness? The answer is no again!

So, let's get started!

Face. We have foundation brushes, powder brushes, bronzer brushes, blush brushes, highlight brushes etc etc. I have in my collection such brushes because I thought they were indispensable. I don't say that I don't like each and everyone, just that if I knew more back then I would skip a few of them.

And to take it to extremes, if I had to choose one brush (shocking!) to do a whole face makeup (foundation, powder, bronzer, blush, highlight) it would be without a second thought the Elf Powder brush at 4,50€ !

The reason is that it's large enough, dense enough, soft enough, doesn't shed like crazy and it's multitasking.

As for application, the best way to achieve a flawless result without wasting excess product on the brush is to work the foundation on my skin with my fingers first and then use the brush to buff it in. Perfect!

Another result of this application is that the bristles stay relatively clean and product free, so it only takes a couple of swipes on a paper towel in order to proceed with powder, bronzer, blush. If you are concerned with product transfer between different type of products, a couple of swipes in between on a paper towel is all that is needed. As for highlight, I use the edge of the brush and it positions highlight just where I want it to.

After I 'm done with face makeup I'll always spot clean it on a paper towel. The brush cleanser that I find works best with this type of Elf bristles is absolute alcohol (70% or higher) and the bristles get clean very easily and quickly. This way, apart from the obvious hygienic results, the brush is in perfect condition for next time because a dirty brush is not only unsanitary but will compromise the result of makeup application.

A more pricy alternative than the Elf one but still quite affordable is the Sigma F80 at $16. I don't have this one but I do have the F82 and the F84 from the same line and they are my most favorite face brushes.

As for concealer, a fine pointed one is perfect for precise application on spots etc. Look no further than the Elf Angled Eyeliner brush at 4,50€. It doesn't have to be angled, it's just the one I have, any type of fine pointed brush will do.

For applying concealer under eyes, I pat in on the under eye area with my finger and then buff it in with the Mac 217 brush. Sigma also makes a similar one, the E25 Blending brush at $9.

Eyes. Here as well, the diversity of the available brushes is insane, but you definitely don't need many of them in order to achieve the desired eye look.

I 've come to the conclusion that the best way to choose a brush is the size of the area above the eyes (small or big) and the preferred way of eyeshadow application (packed or diffused).

  • For small eyelids I would suggest the Sigma E45 Small Tapered brush at $9. I have a similar one from Mac, the 226 and can be used:
    • sideways to pack color on the lid,
    • just the tip to do a smokey outer v or apply eyeshadow on the lash line and
    • it is also perfect for the crease and
    • applying highlight on the inner corner
  • For more eyelid space I think the Sigma E25 is a good option.
For eyeliner, if you use gel eyeliners you can use the Elf Angled Eyeliner brush I mentioned above (yes, it can work for spot concealing and eyeliner at the same time as long as you thoroughly spot clean between different products).
Another option is the Sigma E75 Angled Brow at $11, it's thin enough to be used as an eyeliner brush although the line will not be as fine as with a designated eyeliner brush. Of course it can also be used for eyebrows.
Mac 208 which is a similar brush is my favorite not only for eyebrows but for eyeliner as well because it offers more control than an eyeliner brush with a fine tip.
 
So, the most affordable and efficient way I've found in order to do a whole face makeup is with these brushes:
  • Elf Powder brush for foundation/powder/bronzer/blush/highlight
  • Elf Angled Eyeliner brush for spot concealing
  • Sigma E25 Blending brush for under eye concealer
And for the eyes:
  • Sigma E25 Blending brush or Sigma E45 Small Tapered brush for smaller eyelids
  • Sigma E75 Angled Brow brush for eyeliner and eyebrows
Here's my interpretation of the above list, obviously I have included the Mac ones I own instead of the alternatives I've suggested. If I knew then what I know now my wallet would be fuller, lol!

Extras!

If you have very pigmented blushes/bronzers and you have difficulty in using them, a duo fibre brush will help a lot because with it you can achieve a lightweight application. You can also use it with foundation when you're going for a more lightweight and transparent result.

I have the Mac 187 but also Sigma makes one, the F50 Duo Fibre at $18

Elf makes one as well, the Stipple brush at 4,50€.

If you want to do a detailed eyeshadow work, a pencil brush will be very handy, like the Sigma E30 Pencil brush at $9. Elf has also a couple of small brushes, like the Small Precision brush or the Small Smudge brush.
 
If you prefer to apply eyeshadow in a wash of color instead of packing it on, a large fluffy brush is ideal and it can also be used for blending. Sigma makes the E40 Tapered Blending brush at $11 and the one I use is the Inglot 6SS.
 
Finally, an extra that to me is a staple tool is a lash curler. I had the Elf one but it pinched my eyelids and the most affordable and effective that I've found and use for a few months now is the Mister Mascara lash curler from beautybay.com
 
What's your most effective and affordable makeup tool?
 

I'm not affiliated or sponsored by any of the mentioned brands, I just added the links so that it would be easier for you to see the brushes!


Tuesday, 6 December 2011

November Favorites: Part 1


November is gone (what happened to 2011? It vanished in thin air!) and here are my favorites.

Sigma F84 Angled Top Kabuki Brush: It's been a while since I got this excited over a brush, but I just love this one:
  • Excellent quality: exremely soft but at the same time firm and dense, no shedding, sturdy construction.
  • It applies my foundation (Mac Face & Body) flawlessly and quickly. I just stipple it on my face and because of the size and the density of the brush the result is lovely in no time!
  • The shape makes it also perfect for small nooks, for example arround my nose etc.
  • It applies my foundation a little heavier than my Mac 187, but, F&B is quite sheer, so I actually prefer it this way. 
  • Sooo affordable (at least compared to a Mac face brush)! 
  • The only disadvantage is that it requires two times washing to get clean and it takes almost 2 days to dry.
I love it so much that I've already ordered the Round Top Synthetic Kabuki - F82 and the Precision Tapered - P86 (using the Black Friday free shipping, it took me quite a while to manage to make that order, the site was up, then down, then up, then down, LOL!), as soon as I receive them I'll let you know what I think of them!


Mac Prep+Prime highlighter in Radiant Rose (€22, I got it €15,40, at 30% off, with the Glamour card).
I got frustrated with the Erase Paste by Benefit because of its texture, I felt that it added ages to my eyes because it is quite thick and dense, although soft and creamy. I tried it on top of a silicone primer and it was better this way, more manageable, but too much work for everyday application. So when I visited my local Mac, I decided to try this, although my prior experience with a similar (?) product a few years ago (YSL's Touche Eclat) wasn't very satisfactory (maybe I didn't know how to use it back then?). 
So I just got this one out of pure curiosity, without expecting too much. Imagine my surprise when this little thing actually worked! Of course I have to clarify that I don't have really dark circles, but my under eye area is darker than the rest of my face, and after using this product I realized that I didn't need cover that much as I needed a highlighter.
I love it because:
  • it does light up the under eye area
  • it has a pinkish shade so the result is very natural (I don't really like white stripes under my eyes, LOL!) 
  • it can also be used on the bridge of the nose or anywhere else I want to highlight in a discreet way (without using a shimmering product etc)
  • a little goes a long way
  • it lasts all day without a setting powder.
  • The only con is that it is a bit on the dry side, but nothing that I can't handle (with a little more moisturizer underneath it).

Wet 'n Wild Idol Eyes shadow pencil in Pixie: it's a smooth champagne eyeshadow, no great lasting power though, so I mainly use it under a powder eyeshadow, especially when I want to make the eyeshadow color less vibrant, more muted. If I want to use it alone, I just add a tiny bit of translucent setting powder on top.


Korres #5 Olive Green eyeliner pencil: I got it mainly because I love the color and thought I could use it as an eyeshadow, but it is a little hard to apply it since it's not very soft. What I do is that I rub it on my hand, so as to warm it a little bit. I also wear it on top of the Wet 'n Wild Pixie pencil, because it is easier to apply it this way and it also turns into a gorgeous grey-silverish-frost light green color!

Swatches: Wet 'n Wild Pixie, Korres #5 Olive Green, Olive Green on top of Pixie.


Mac Smolder Eye Khol: I love this pencil for the upper waterline because it is dark and buttery soft. I wouldn's use it anywhere else though because it smudges a bit (I prefer gel eyeliners, Mac's Avenue is my favorite).


Mac Sheertone Blush in Breath Of Plum: I got this blush a while back because I didn't have anything in the plum family, but I didn't use it that much, until November, when it became my (almost) everyday blush. I use my Mac 187 with it because it gives my cheeks the subtle, a little muted and sophisticated result I'm looking for when I'm going a little heavier on the eyes, especially with smokey looks.


Mac matte lipstick in Ruby Woo and Love Alert Dazzleglass: Ruby Woo is my first (and only one so far) red lipstick and I chose this shade because it has a retro appeal, especially if used light handed over a lip balm, it's sooo pretty that I don't need anything else (apart from mascara, defined brows and a smidgen of blush, to be accurate, LOL!). If I want to spice it up, I use a tiny bit of the Love Alert dazzleglass on top. There is one major default though, it is verrrry dry, but I never wear full red lips, I always layer this on top of a bit of lip balm, so I don't mind. Although, if used without the lip balm, it would probably stay on my lips ALL day long!

Swatches: Ruby Woo (blended out on the right), Love Alert, Love Alert on top of a little of Ruby Woo.


I have a few more favorites but since I don't want this post to go on for ever, a part 2 will follow!
Related Posts Plugin for WordPress, Blogger...